click here I sewed my first Archer Button Up last year and it has quickly become a frequently worn wardrobe staple. I was so happy with it, that I knew I wanted to make more. When I was in NY last fall, I picked up a beautiful piece of polka dot chambray with plans to make another Archer. I don’t usually sew the same thing back to back, but with the way I organize my patterns, the pattern pieces stay out on a hanger while I am working on a project and I only have room for so many patterns to be out. When I start a new project, I usually file the last project’s pattern pieces away in a binder. I hadn’t started anything new yet, so rather than put the pieces away, I decided to go ahead and sew it up right away. This saved me time by not having to put the pieces away, then bring them back out and iron them (since I have to fold the pieces to fit them in the binder). How’s that for efficiency? I just may have to sew this way more often!

https://autismwish.org/tuta07cw https://geneticsandfertility.com/42ogfbj Pattern: Grainline Studio Archer Button Up

- Same as my first archer button up: lengthened the sleeves 1″, added 1″ to the length and took the shoulders in 1/2″.
- I used the regular square pockets included in the pattern this time (vs. the Negroni pockets from last time). They felt long to me though, so I shortened them about an inch.

- It was so nice not having to match any plaid this time, so it took way less time to cut the fabric for this one.
- My new Janome MOD 100 (that I bought at Camp Workroom Social last year) sews awesome buttonholes!
https://splendormedicinaregenerativa.com/oq9782q 
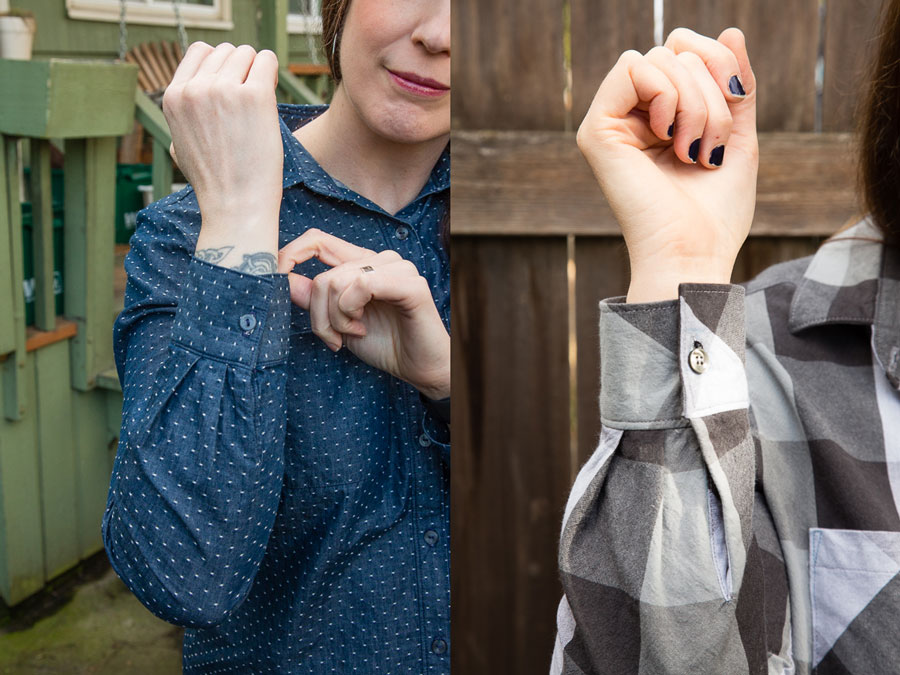
https://etbscreenwriting.com/0u0caiy In my post about my original Archer Button Up, I wrote that I thought I had sewn the cuffs on backwards, but I wasn’t totally sure. Now that I have sewn this again and did it the opposite way this time, I am 99.9% sure I had sewn it wrong the first time. On my first one, I reversed where the button and buttonholes were, so the button was on the top flap and the buttonhole was on the bottom. This time I did the opposite and sewed the buttonhole on the top flap and the button on the bottom. It sounds confusing, I know, so here are the cuff photos side by side to to help illustrate.
https://www.inaxorio.com/5c3s4kic It’s super subtle and not a big deal; my first Archer is totally still wearable. It just makes it button backwards, which I don’t like because to me it feels harder to button that way.

Something to note is that you also have to make sure you sew the cuff on a certain way or the placket won’t overlap correctly when buttoned. One side of the placket folds under and one stays out flat. The side that folds under is where your buttonhole goes since that will be on top as pictured above. I found that to be a little confusing my first time, so if you are about to sew the Archer Button Up for the first time or have been confused by this as well, hopefully this is helpful!

And here it is styled with my Thelma and Louise shawl. I wear this sucker with everything. That said, I’m very happy with how my handmade wardrobe is coming together. Everything I have been making lately is super wearable and coordinates well with my other makes, so I feel like I am on the right track finally!

Why not take the button off, sew a buttonhole in its place, and sew up the original buttonhole when you sew the button on the right side?
I’ve done it several times. Just can’t seem to get my head around the mechanics of cuffs.
Both lovely shirts though. Very inspiring.
Hi Val, thanks for the tip! I suppose that could work! Only thing with this pattern is then the placket wouldn’t overlap right (it’s sewn to close a certain direction). That could be a good trick for changing which way a shirt buttons (in the front) if I ever needed to.