Order Tramadol Online Cod I am proud to announce, that here to kick of the holiday season, with an amazing and inspiring tutorial on soap making, is guest blogger, Kate Baker! Fun fact, Kate is the sister of Rake and Make logo designer, Chip Baker. Talented family!
Tramadol Buy Canada Thanks Kate for this post! I totally want to try this now. Or I might just try to get some of what Kate made. It looks awesome. I have smelled previous batches and they smell amazing too!
https://splendormedicinaregenerativa.com/a9nmlsmv Happy Holidays everyone. Maybe you can make some soap for gifts now too. Look out for next weeks post on my personal favorite handmade holiday gift, cloth napkins!
go to link -Lilly
https://living4youboutique.com/yze7if1ri Ever since I was a young girl I loved buying handmade soaps at local fairs and farmers markets. What I enjoyed most was how it was all natural, no animal testing, and those essential oils were sooo fragrant! But the process of using lye always staved me off.
https://www.inaxorio.com/vr52sgv65z Recently I realized there was no reason for me or anyone to be intimidated by Lye (Sodium Hydroxide). When you were in 8th grade chemistry class, you surely handled worse!
https://hymnsandhome.com/2024/07/25/ak5kts8zx So I will show you a simple process for making Cold Process Soap using all natural oils, botanicals, and essential oils. Let’s begin!
https://www.pathwaysmagazineonline.com/5fnm49kr This particular recipe we are making Orange Pomander Soap. I adapted this recipe from a wonderful site for soaping called FIMBY. It is laden with orange and clove essential oils and botanicals and smells amazing!
Order Tramadol Online Cod “From the Middle Ages through the Renaissance, pomanders were considered an important and even necessary accoutrement in navigating through a pungent and often foetid world.”-quoted from langantiques.com
https://www.insearchofsukoon.com/pgbsz11s To start, most importantly, clear your workspace of any children and/or pets, during the entire process. Lye is corrosive, and will burn instantly. So best to keep little ones out of sight (like at the zoo) 🙂
source link Ok lets do this!
https://www.pathwaysmagazineonline.com/o6chya17mbs 1. Gather all of you tools and supplies and set them up.
https://www.adroitprojectconsultants.com/2024/07/25/z5xzg9yq 
click You will need some basic things. I ran to Goodwill to buy the glass measuring cup, stick blender, and used old wooden spoons, spatulas, and containers that I keep just for soaping. I think it is ok to re use stainless steel but I personally keep everything separate.
- safety googles, mask, and rubber/latex gloves (pretend you’re in science lab, circa 1991) 🙂
- a basic kitchen scale (it is best have accurate measurements by weight)
- stick blender (this make the mixing process much easier)
- rubber spatula, wooden spoon, measuring spoons (stainless steel),
- stainless steel saucepan, medium sized
- candy thermometer (oils and lye must be the same temp before adding together)
- rag bath towel or old blanket
- Pyrex measuring glass, old large plastic yogurt/food containers
- a clean half and half container or Pringles can (as the mold for the soap)
Tramadol Pay With Mastercard *I used a wood mold my dad and I made while visiting TN, but before that I was just using quart milk containers, which work great! You can either pour directly into the top of the container or cut open a flap on the long side and flatten/tape off the original opening of the container (which is nice if you want to pour a solid color on top or dust with cocoa powder, embellish with orange slices, you name it!).
https://hymnsandhome.com/2024/07/25/k7zkr79fu 2. Gather your ingredients:
https://ict-pulse.com/2024/07/91wdpasr19u Oils: Olive Oil, Coconut Oil (adds hardness and moisturizing properties to your bar of soap), Palm Oil (adds hardness), Shea Butter (moisturizing), and Castor (produces a bubbly foamy bar). *Carrier Oils, essential oils, and botanicals can all be purchased online at New Direction Aromatics and Mountain Rose Herbs.
- Sodium Hydroxide *Lye can be purchased at Zenith Supplies in Seattle or online at Camden Grey.
- Essential oils: Rosemary, Orange, Clove
- Botanicals: fresh ground clove, fresh ground allspice, cocoa powder, vanilla bean powder (optional)
- Ice cold water
follow link I use a great standard recipe: Basic 4-Oil Soap Recipe and added unrefined Shea Butter. *Any time oils are added or changed, use a Lye Calculator (SoapCalc is great) to get the proper amount of lye to water ratio.
Cheap Tramadol By Cod POMANDER SOAP RECIPE: (Yields 2 pounds of soap)
https://thefooduntold.com/food-science/zej33ajza 7.5 oz Extra Virgin Olive Oil
https://living4youboutique.com/a71bffpfbis 6.5oz Palm Oil (organic/sustainably harvested)
https://www.insearchofsukoon.com/fiscc9atxf 4.5oz Coconut Oil (unrefined)
enter 2oz Shea Butter (unrefined)
follow link 1.3oz Castor Oil
https://www.techonicsltd.com/uncategorized/rodur5wd .2 oz Rosemary Officinalis Essential Oil
go to link .5oz Clove Bud Essential Oil
.6oz Orange Essential Oil
1 plus 1/2 tsp Cocoa Powder
1/2tsp cloves, ground
1/2tsp allspice, ground
1 tsp vanilla bean powder (optional)
8.2 oz Cold Water
3.1oz Lye
PROCESS:
Measure out the hard oils in your saucepan and heat gently on medium low until completely melted. Add liquid oils to pan and stir. Clip thermometer to pan (but not touching bottom of pan) and turn off heat.
 Protect table surface with old towel or vinyl tablecloth.
Wearing gloves and goggles, and mask (with included respirator), measure out lye crystals into plastic container. Set aside.
Using scale, measure out ice cold water in pyrex cup.
To avoid fumes, use a fan pointing toward an open window.
Place Pyrex cup in the sink and SLOWLY add Lye to water (ALWAYS add LYE TO WATER, never the other way around.) Stir gently and continuously as you add all the lye crystals. Stir well and set aside. This solution will heat up greatly and is caustic so set on a protected surface, out of the way.
When both the Oils and Lye solution are at about 110 degrees F, SLOWLY pour lye solution into oils, stirring constantly with wooden spoon.
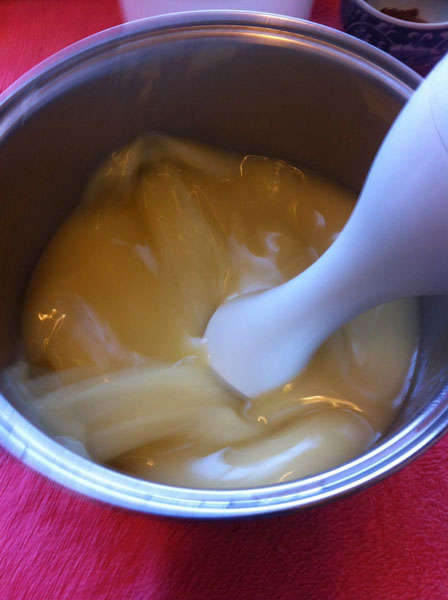
Set wooden spoon aside and using the stick bender, alternate between stirring manually and pulsing in short bursts. This will keep the soap from reaching trace too quickly, ensure that it is fully mixed, and produce less bubbles in your soap. Repeat this process for several minutes until you come to “trace”. Trace is reached when the oils and lye have begun to thicken to a pudding like consistency and when drizzled on the top, the soap stands on the surface a moment before sinking back into the mixture.
-photo by Renee Tougas at FIMBY
At trace add you essential oils and mix well to incorporate.
Now pour 1/3 of your traced soap into a med/large plastic container. Add botanicals and mix well to incorporate. This is your chocolate colored portion.
Now comes the fun part! Making lovely swirls in your soap is so simple and beautiful!
This is the “Swirl in Pot Method”:
From about 1 foot or so above saucepan, pour chocolate/spice soap mixture in dollops at 12 o’clock, 3 o’clock, 6 o’clock, and 9 o’clock, respectively. Set aside 1 cup or so remaining chocolate color to top off your soap with a slab of solid color, if desired. If you are pouring the whole thing into a quart milk container, use all of the chocolate spice soap. Don’t waste any!
Now, not giving in to temptation, because we are good and perfect this holiday season, we will only stir the newly colored soap ONE TIME in a CLOCKWISE direction. That’s it!
Now to pour into your prepared mold.
Pour steadily and gently at one end of the mold and slowly move toward the other end while pouring. For upright containers, tilt at an angle while pouring (optional). Use rubber spatula to remove all the soap from the pan.
Gently top with remaining chocolate colored soap, smooth out and fluff surface with wooden spoon, being careful not to disturb layer underneath. Embellish with dried orange slices (optional). Cover exposed soap with plastic for wood molds. For milk containers, tape the flap back down or staple opening shut.
Ok now INSULATE! Wrap the mold in old bath towel or blanket and set in a warm dark place (out of the reach of children and pets) undisturbed for 48 hours so it can set up and harden a bit.
Now you can see what you created!
Using rubber gloves (the soap may still be caustic) and with children and pets out of sight, remove your soap from their molds. For quart container molds, gently peel off the paper. Slice into thirds, flip over and slice into thirds again. Or just slice nice little squares about 3/4 to 1 inches wide to get 8-9 bars of soap.
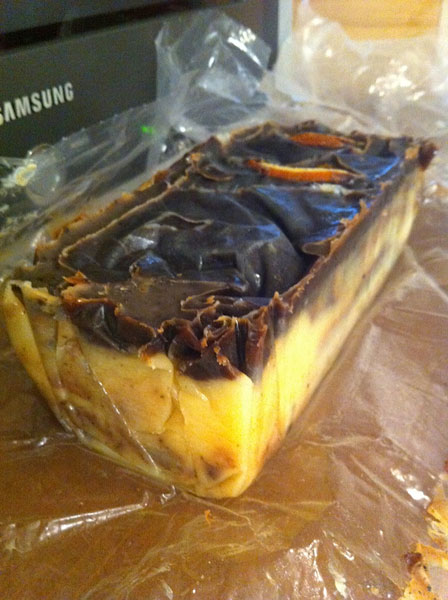
Here is the Pomander Soap out of the mold and ready to be sliced…
Using a sharp chef’s knife, I sliced these in roughly 3/4″ increments. They smell sooo good!
Final Stage: CURING
Soap needs to cure (by water evaporation) and harden 4-6 weeks before use. Set bars about an inch apart (to let air circulate around each bar) in an open shoe box or cardboard flat in a cool (not cold) dry area. Rotate bars every week to make sure all sides get exposed to air. Also, utilize a soap dish with good drainage to let soap dry out between uses as standing water will limit the lifetime of your bar. Enjoy!
I think you might find soap making limitless in possibilities. The combinations of botanicals, colors, fragrances, and packaging are endless! They are wonderful to give as gifts during the Holidays and to share with family and friends. Best of all, it is made by your own hands.
Happy Soaping!


Wow! Great article Kate! You make lovely soap.
Thank you Michelle. And thanks for being my tester! 🙂
Thank you for this great tutorial Kate and I love your soap!
Can I ask you two questions please?
Can the saucepan be put on direct heat and is there a danger of burning the oils
this way as opposed to using a bain marie?
Hi Anne, Thanks for your question. I am emailing Kate as we speak to get the answer to your question. Sit tight and thanks for your patience!
Hello!
I gently melt the hard oils in a medium/large saucepan directly on the burner (medium to med/low heat). Stir often to regulate the temperature. Then add the liquid oils to mix and to bring everything to the correct temperature.
Happy soaping!
~Kate
This soaps looks edible!!! Yummy for your skin!!! Great tutorial!
Hi, I see you used plastic to line your soap mold, it doesnt melt at all? I currently use baking paper to line and get rounded corners unfortunately, Also wondering if it is a special plastic lining? Your soap loks amazing
Dianne
Hello, I am just now seeing this post…I apologize!!
I now use silicone loaf molds bought online from Bulk Apothecary or Brambleberry. (The plastic never melts but does heat up in the gel phase)
Love this blog post! This is exactly how I make may soap. Your pomander soap is so lovely! thanks for sharing!
Your soap is so very pretty. Thanks for sharing the recipe.